Conflicting Genius

Musings on everything past, present, and future

Opinionated List of Good, Modern TV Shows

Caveat: The following is strictly my opinion. You’ll likely disagree, and I don’t mind. If I did, it’d be like forcing someone to change their favorite food.

There’s not a lot of new, good TV shows these days. Most seem to fall into one or more of the following categories:

  1. Promote the current agenda of those in power. Three words: Gay Space Rocks.
  2. Are bog-standard remakes or retreads of previous material with minimal effort made towards the execution. CSI: Cyber and its reliance on CSI’s incompetence with cyber-anything for its appeal come to mind.
  3. Actively teaching madness. There’s a show where the devil is portrayed as a good guy now….

Thankfully, I’ve found there’s a couple of shows out there which defy this and are actually pretty good. They’re not great, but they’re still well worth the watch.

  • Gravity Falls

Two siblings, one a serious boy who wants to be older, and the other a hyperactive girl whose love for others and adventure know no boundaries, are scurried away to their Grunkle (great-uncle) Stan’s tourist trap in a middle-of-nowhere town. Except it really shouldn’t be – the town’s home to myths, legends, and the supernatural, all very real and most wanting you dead. This is the setting for one of the most imaginative good-vs-evil stories I’ve encountered. Plus, it teaches great lessons on manhood, family, and why you should fear demons. Seriously – this show has a legit demon in it, and the show is very clear that he spews nothing but lies and half-truths, and will always come out on top if you try and take him on. (Unless, of course, you can find his series-ending weakness, but this is a godless secular show, so that’s an unfortunate given.) [Available on iTunes and the Disney XD website (cable subscription required).]

  • Person of Interest

If you’ve heard of this show, you’ve likely heard it portrayed as “a police procedural meets Minority Report”. These days, it’s more “a ragtag team of anti-heroes and their benevolent AI god battle the forces of a malevolent AI god, while saving innocents on the side.” (Or, for the gamers and geeks out there, “Deus Ex if it were grounded in real-world technologies.”) It’s a brilliant show which blends action, sci-fi, and subtle Twilight Zone values and philosophies into an incredible whole. Oh, and all the weird tech the heroes and villains use, like Wi-Fi based radar and a supercomputer built from PS3’s? It exists. It would seem the writers have realized truth is stranger than fiction. [Seasons 1-4 on Netflix, Season 5 is airing]

  • Granite Flats

What do a meteorite, a young boy’s deceased soldier-father, and the Utah town he’s moved into have in common? Quite a lot, actually. This series is remarkable for two very good reasons: first, it’s a great mashup of the detective and spy genres; second, it’s a show with wholesome 5o’s values and modern writing. You and your family will love as the young boy and his fast friends plunge the town of Granite Flats into a rabbit hole of secrets and Cold War-era sypcraft – and end up growing up into fine young adults in the process. [Full series on Netflix.]

  • Danger Mouse (2016)

A fast-paced re-imagining of the classic, quick-witted 1980’s animated series. Swapping the wit for more generic humor but keeping the legendary fourth-wall breaking, this madcap series stars the world’s foremost expert on fighting crime in the most dangerous way possible, Danger Mouse, and his not-so-bright assistant, Penfold. Together, they face an absurd rouge’s gallery, try their best not to annoy their resident world’s-greatest-genius Professor Squackandcluck (that’s her literal full name, BTW), and occasionally team up with the world’s most serious secret agent, the female American Jeopardy Mouse. [Available on Netflix stateside.]

  • Thunderbirds Are Go

Another re-imaging of another classic, Thunderbirds Are Go sees the professional world-saving antics of International Rescue, a private search-and-rescue company owned by the Tracy family. Aided by their engineer and scientist Brain, their security chief Kao, and special agent Lady Penelope and her assistant Milford, they travel the world saving lives, fighting the evil machinations of The Hood, and investigating their father’s mysterious disappearance. If this sounds like yet another action-adventure series for young kids, it isn’t – the Tracys work as an actual team, use legitimate and clever improvisation when things go wrong, and handle their work and interactions with others very professionally. Plus, their rescue machines, the Thunderbirds, are so filled with accurate details and minutiae, you’d swear they were real machines.

Quick way to pre-viz color-stripping

Let’s say you have an image, like this one:

Grand_Canyon_in_fog.jpg

You’re working on a project where you want to limit the number of colors used in the image. Maybe it’s because you’re on a budget. Maybe it’s because you’re trying to emulate the color palette from a retro game, just without the low resolution or pixellation. Maybe you’re doing it because it’s a challenge.

In any event, let’s pretend you want to change this particular image so it has roughly 32 colors, and have those 32 colors come from an image like this one by artist John Harris:

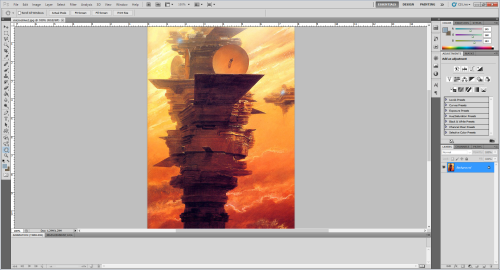
microdrive2.jpg

With a bit of creativity, you can get an idea of how 32 colors will translate to the target image:

Grand_Canyon_in_fog_colorblend

The question is: how do you quickly transpose 32 colors of your choosing from the second image into the first so you have an idea of where things could go? One way is to create a color table containing all the colors you want from the second image, apply it to a copy of the first, then blur the result and layer it over the original using either Hue or Color blending. Here’s a step-by-step guide on how I’d go about doing it – at least, as far as Photoshop is concerned:

  1. Get the image containing the colors you want open in Photoshop.

Step1.PNG

2. Select Image > Mode > Indexed Color… (now called Color Table in the CC editions)

Step2.PNG

3. The following window will appear:

Step3.PNG

This window will allow us to setup an indexed color palette (aka a color table) for the current image, which we can then save and use later in other images. Before we move on, though, let me give a brief overview on the items in the Palette section:

  • Palette: This drop-down list contains all the different methods Photoshop has for auto-generating the base color table for the current image. It also contains a few pre-built color tables for common use cases, like the default color table used by Windows versions preceding Windows 8/8.1 as well as the ability to create your own color table using up to 256 colors.
  • Colors: This lets you dictate the maximum number of colors Photoshop will use from the image for its color table auto-generation methods. Valid values are from 2-256.
  • Forced: This drop-down list contains dictates whether specific colors, either from a pre-built color table or one you create, must be included in the final color palette.
  • Transparency: This checkbox defines whether transparencies are allowed in the final color table.

4. Make sure Preview is checked so you can see the results of the next step.

5. Set the Palette section as follows:

  • Palette: Local (Perceptual)
  • Colors: 32
  • Forced: None
  • Transparency: Unchecked

Notice how the image very closely resembles its original self…but not quite. Take a look at the platform in the middle-right of the image:

microdrive2_indexed_firstcomp.png

See how the light in the indexed version now looks washed out and – more importantly – the wrong colors compared to the original? Since we want the palette to accurately reflect the important colors in the image, we’ll need to correct this before we continue.

6. Open up the base color table by selecting Custom… from the Palette drop-down.

Step4.PNG

Now the color table window appears. This window allows you to view the current colors and (if the Transparency checkbox from before is checked) transparencies currently in whatever color palette you’re currently editing. (In this case, we’re editing the base color palette.)

Step5.PNG

7. Modify the palette to contain the colors you need.

Picking just the right colors to form a color table is an artform unto itself – so you’ll need to look up the finer points online if you’re curious. (Specifically, try Googling “pixel art tutorial” for some good material.) Otherwise, for this example, just make sure the color table matches the above image. Once you do, the image, when previewed, will look much closer than before:

microdrive2_closeup_comp.jpg

8. Save the color table using the Save… button. (Photoshop color tables are saved as .ACT (Adobe Color Table) files.) Name the table whatever you want.

Now that we have the color table saved, let’s close this reference image and open the image we’ll be using the color table with.

9. Close the image, then open the image you want to use the palette on.

Now let’s bring in the color table we created earlier…

10. Click on Image > Mode > Indexed Color

11. Select Custom from the Palette drop-down menu.

12. From the Color Table window which appears, click on the Load… button and open the color table you saved in Step 8.

13. Click OK. Make sure Preview is checked.

Now that we have the color table loaded, we need to perform some dithering on the image so we won’t get nasty, obvious color-banding in later steps. There are three different types of dithering we can perform in Photoshop:

  • Diffusion: This dithering type uses differing strengths of noise to create transitions between color bands. This is the only setting where you can control the amount of dithering, with valid values being from 1-100.
Grand_Canyon_in_fog_dither25.png

Diffusion with “Amount” set to 25%

Grand_Canyon_in_fog_dither75.png

Diffusion with “Amount” set to 50%

Grand_Canyon_in_fog_dither50.png

Diffusion with “Amount” set to 75%

Grand_Canyon_in_fog_dither100.png

Diffusion with “Amount” set to 100%

  • Noise: This uses a (relatively) consistent noise pattern to dither the image.

Grand_Canyon_in_fog_noise.png

  • Pattern: This uses a (relatively) consistent pattern of shapes to dither the image.

Grand_Canyon_in_fog_pattern.png

The goal is to find a dithering method which, when blurred, will look the closest to the target look (read: best passes the “squinted-eye” test). For our purposes, we’ll be using diffusion dithering as it works the best with our desired set of 32 colors.

14. Configure the settings in Options as such:

  • Matte: None
  • Dither: Diffusion
  • Amount: 75
  • Preserve Exact Colors: Unchecked

15. Click the OK button.

Now we’ve converted our image such that it uses a color table we made instead of the full 8-bit RGB color palette. In order to blend this with the original image, we’ll need to apply some filters with the color table-based image to get rid of the obvious pixellation caused by dithering.

Just one small problem: images in Color Table mode can’t use Photoshop’s filters. Thankfully, it’s trivially-simple to switch back to RGB.

16. Click Image > Mode > RGB Color

17. Apply the Gaussian blur filter with a radius of 1.4px.

Grand_Canyon_in_fog_blurred.jpg

This eliminates the pixellation at the expense of image clarity. In the case of this technique, an unclear image is OK, but too much blur means blending will be impresice, resulting in a poor-quality image. In my experimentation, Gaussian blur with a radius of 1.4px works the best; however, feel free to do your own experimentation and try other methods of blurring to see what works best for your purposes.

Now that we’ve prepared the image for blending, we’re going to copy the image as it is now, revert the changes, then paste into a new layer.

18. Select the entire image, then press Control-C (Command-C on a Mac).

19. Revert the image.

20. Paste the image copied in Step 18 into a new layer. Ensure this layer is above the background layer.

With the blurred image we generated with a color table pasted into a layer, we can now proceed to blend it with the original image. Generally, there are two primary methods to achieve the look of a color table-based image in full color: hue blending and color blending. Here’s what these two methods look like with the image we’re using for this example:

Grand_Canyon_in_fog_hueblend.png

Hue-blended image

Grand_Canyon_in_fog_colorblend.png

Color-blended image

For this example, we’ll use color blending.

21. Change the blending mode on the layer created in Step 20 to Color.

And there we have it! We now have an image which has the look of a dithered image without pixellation from dithering. Here’s a before/after comparison:


Grand_Canyon_in_fog_beforeAfter.jpg

The Framerate Police vs. Reality

This is what they think will happen:

Industry is converted to their viewpoint

We BELIEVE in 60 FPS!!

This is what will happen:

Industry ignores complaints

Pictured: representative response to Framerate Police by the industry.

Jeff Minter’s TxK – Legal FAIL

Yesterday, I read about Atari suing Tempest creator Jeff Minter and his company Llamasoft regarding his new Tempest-esque game TxK. Initially, I thought it to be incredibly stupid since, y’know, the man created Tempest and its sequel Tempest 2000. Of course, why would Atari, recently resurrected from its bankruptcy, want to control something they clearly don’t?

Well, there’s the little case of Mr. Minter’s new game looking and playing remarkably like his previous works – so much so, you’d swear you were looking at Tempest! Furthermore, it would seem by his statements that Mr. Minter thinks since he created Tempest, he owns the rights to it automatically. Just ask Wally Amos how that went when he tried to use the word “Amos” in what ultimately became known as NoName Cookies. That combined with how similar TxK looks and plays to the game its supposedly just ‘based’ off of, and you’ve got yourself an excellent, well-defensible reason to sue somebody.

Oh, and the fact that Atari never sued Mr. Minter. And actually started trying to resolve things when they said they did.

In short, Jeff Minter seems like an otherwise well-meaning fellow who’s convinced himself into believing a lie and is refusing to think otherwise. I hope he shakes himself loose – because if he doesn’t, he’s gonna be sued profusely. And not by Douglas TenNapel.

Mass Dummy File Creator – BAT Edition

Those who’ve read my blog recently will remember my Mass Dummy File Creator. However, some of you might have been wondering, “Why did you create an entire application to do what could be done in the Windows Command Line?” To that, I would say, “I didn’t know I could until I looked!” Therefore, I’ve create a separate repository for a version which uses the Windows Command Line via a Batch file to create dummy files, backup files, and/or restore created backups. It does almost everything the original does, with two differences: there’s no way to backup then dummy out files (easily added), and only files with a single extension are supported (not so easily added). In an attempt to fix the latter, I will be recreating the Mass Dummy File Creator – yet again! – into Windows PowerShell, which I hear is significantly more powerful than a Batch file.

Mass Dummy File Creator v1.1

I just updated my Mass Dummy File Creator to version 1.1! Aside from some improvements, such as threading the file dummier, I also optimized the program so it only holds onto as much information about the files in the directory as needed – namely, the files with the user-specified file extension. You can find the updated code on GitHub: https://github.com/Expack3/MassDummyFile

I just created my first code repository!

I just recently created my first code repository on GitHub for a program I called the Mass Dummy File Creator, which replaces files of a user-specified extension contained within a folder with empty “dummy” files. Rather useful for diagnosing issues with audiovisual content for an application or bypassing annoying videos in a PC video game. Any comments, feedback, and/or critisism would be greatly appreciated!

You can find the code repository here: https://github.com/Expack3/MassDummyFile

Musings on Science and Logic

Authors note: The following was postulated by me at this week’s κοινότητα (Community) gathering at Saint Thomas the Apostle Catholic Church in Grand Rapids, Michigan.

As Fr. Robert Barron wrote in his Word on Fire blog post, The Myth of the War Between Science and Religion, modern science is not in conflict because Catholicism holds that ours is a created world. “To hold that the world is created is to accept, simultaneously, the two assumptions required for science, namely, that the universe is not divine and that it is marked, through and through, by intelligibility.” As Fr. Baron also writes, because the world is marked throughout by intelligibility, science is possible because it relies “upon the presumption that nature can be known, that it has a form.” Hence why scientists are able to create things like chaos theory, which studies mathematical systems highly sensitive to how they are set up initially, and be able to get predictable, repeatable results.

As such, I would ask a simple question: if, as atheists posit, God does not exist, then how can we guarantee logic actually exists in the universe? Could it be that, in order to maintain our sanity, we assign meaning to things which, in fact, lack the meaning assigned? Do we assign logic where there is no logic? Food for thought….

Character Set Woes, or How C# and Java Differ When Writing to a File

Recently, I just finished porting my Java JAR-based console app to C# .NET. It was a fun, challenging little venture – but there was one thing of note which makes me want to repeatedly slam my head into the nearest wall. That, my friends, is the differences in how C# and Java write an integer to a file.


Before I get into differences, here’s an example rundown in sudocode:

1. Assume the code will eventually be outputting to a file in the Latin-1 character set.

2. Assume the following variables exist:

  • The 16-bit integer k, used to keep track of the number of bits in a given byte.
  • The 16-bit integer j, used to keep track of what part of a given byte is being accessed.
  • The 16-bit integer i, used to keep track of which string array is being accessed.
  • The 16-bit integer s, used to store the final Latin-1 bytecode.
  • The list of the 2×1 string arrays vectorString, which stores the complete Huffman Compression encoding table; the first row contains a character, while the second row contains a string holding the bits representing the character in row 1.
  • The byte byter
  • The file writer writer; it is set to use Latin-1 encoding.

If k does not equal 8, do the following:

 If the character in element j of row 1 of the string array kept in element i of vectorString is not equal to the character 1, do the following:

Make byter equal to the result of the new byte created by applying a logical OR to byter using the result of shifting 1 by 7-k bits.

Increment k and j by 1.

Otherwise, do the following:

Make s equal to the result of applying a logical AND to byter using 0XFF

Write the Latin-1 character represented by s to a file.

Make byter equal to 0.

Make s equal to 0.


OK, now that we know what supposed to happen, here’s how to ensure s is correctly written to the file in each language and what that actually looks like:

Java

Write the character represented by s to the file based on the encoding used by the file writer.

bitWriter.write(s); (bitWriter is a properly-initialized FileOutputStream)


C# .NET

Write to a file the string created by getting the Latin-1-formatted bit string of a new 1×1 byte array containing the result of  converting s to a byte.

bitWriter.Write(Encoding.GetEncoding(“iso-8859-1”).GetString(new byte[] { Convert.ToByte(s) }));


WHAT THE HECK HAPPENED?!?!


As it would turn out, Java seems to default to Latin-1 for file IO and has a nifty file writer called a file output streamer which works exclusively with raw bytes; C#, however, defaults to Unicode-16 for file IO and only has a file writer called, creatively enough, a file writer, which works exclusively with characters. The result is in Java, I can simply throw bytecode at the streamer and it outputs properly; in C#, however, I have to convert s back into a byte, then take the result of that and convert it into a Latin-1 character. It’s so head-bangingly convoluted I still can’t get over it!

Retro Gaming without CDs: Old Time Baseball

Released in 1995 by Stormfront Studios, makers of the then-popular Tony La Russa Baseball series of baseball simulators, Old Time Baseball was a spinoff of Tony La Russa Baseball 3 – with the twist of being able to play as every major team from the beginning of baseball in the 1890’s up to the present and being able to pit two teams from different eras against each other. If you’ve ever wanted to see what Babe Ruth could do against the likes of Hank Aaron, this is the game for you!

Just like the game itself, getting Old Time Baseball to run without its CD is pretty straightforward – unlike what a first glance would reveal. The game has a hard-coded requirement for a CD-ROM, and the game’s configuration file is encrypted with little indication as to how it was encrypted. Thankfully, using DOSBOX’s built-in support for making OS folders look like actual CD-ROMs makes CD-less support for this game possible.

The Nitty-Gritty

  1. Create a folder somewhere on your hard drive called Old Time Baseball. Ensure you don’t place it within your Program Files folders – it will cause major issues with how the game saves.
  2. Download the latest version of DOSBOX from http://sourceforge.net/projects/dosbox/files/latest/download?source=files
  3. Install DOSBOX to the folder you created (i.e. if you put the folder on your C drive, you would install DOSBOX to C:\ Old Time Baseball \Dosbox)
  4. Insert the game disc into the CD-ROM drive of your choice.
  5. Navigate to the folder you installed DOSBOX to, and run dosbox.exe
  6. You will see DOSBOX’s command line.
  7. Type the following command into DOSBOX: mount c “..\..\Old Time Baseball”
  8. Press the Enter key. By doing so, DOSBOX will treat the folder you entered previous as the C drive of the emulated MS-DOS system.
  9. Before we move on, I’d like to explain why I had you type in those dots. Those dots tell DOSBOX to use what’s called relative pathing to look at a specific folder which is up one in the chain of folders. This allows these instructions to not rely on a specific path, and it enables some nifty things later like being able to run this off a flash drive. As this can get complicated to explain, I’ll let this image explain:

DotDot-Explanation

  1. Type the following command: mount d d:\ -t cdrom (Replace d with the letter of your CD-ROM drive.)
  2. Press the Enter key. DOSBOX will now treat the drive you specified as a CD-ROM drive accessible by the emulated MS-DOS system.
  3. Type in the following command: d:
  4. Press the Enter key. You’re now on the CD-ROM drive.
  5. Type INSTALL into DOSBOX, then press the Enter key.
  6. You will see the Old Time Baseball installer appear. Press the Enter key.
  7. You’ll then see a list of optional components. Press the Enter key to ignore this screen and continue to installation.
  8. Once installation is complete, press the Enter key.
  9. Enter SETUP into DOSBOX, then press Enter.
  10. You will be presented with the Old Time Baseball setup program. It will first ask for your video card.

VideoSetupOTB

  1. Ensure the “Auto-Detect the Video Card” option is selected using the arrow keys, then press the Enter key.
  2. You will then be presented with a new screen which says it is “Detecting SVGA type”. Press the Enter key.
  3. Press Y at the screen which appears.
  4. At the next screen, press the Enter key.
  5. You will then see a sample image from the main menu of the game. Press the Enter key.
  6. Press Y at the screen which appears.
  7. You will then be presented with the sound setup screen.

SoundSetupOTB

  1. Select the “Done” option from the menu using the arrow keys, then press the Enter key.
  2. You will then see a screen asking you to configure two joysticks. At each joystick calibration prompt, press the Escape (ESC) key to cancel the configuration.
  3. You will be returned to the DOSBOX prompt.
  4. Type exit into the DOSBOX prompt, then press the Enter key.
  5. DOSBOX will automatically exit.
  6. In the Old Time Baseball folder you created, open the folder called OLDTIME.
  7. Right-click on an empty space within the folder, then click on the “New Folder” option from the menu which appears.
  8. Name the new folder CD
  9. Open the folder you just created.
  10. In a separate window, open the CD-ROM drive containing the Old Time Baseball CD.
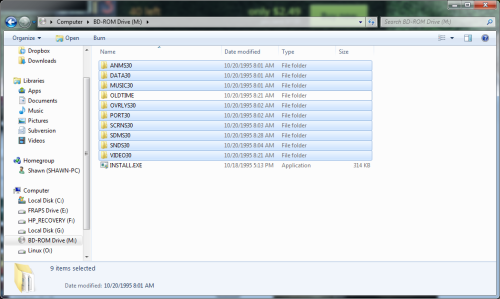
  11. Select everything highlighted in blue in the image below:

OTB_CD

  1. Right-click on one of the selected folders, then select “Copy” from the menu which appears.
  2. Paste the folders into the CD folder.
  3. Go back to where you installed DOSBOX, and open dosbox.exe.
  4. You will again be presented with the DOSBOX command line.
  5. Type the following command: mount c “..\OLDTIME”
  6. Press the Enter key. By doing so, DOSBOX will treat the actual folder containing the game as the C drive of the emulated MS-DOS system.
  7. Type the following command: mount d “..\OLDTIME\CD” -t cdrom
  8. Press the Enter key. By doing so, DOSBOX will treat the CD folder you created as a CD-ROM drive with drive letter D which is accessible by the emulated MS-DOS system.
  9. Type the following command: c:
  10. Press the Enter key. You’re now in the game folder.
  11. Type OLDTIME into DOSBOX and press Enter. The game will now play!

If you don’t want to repeat steps 40-48 steps every time, just download this file and place it in the folder where you installed DOSBOX. Using the file, all you have to do to play the game is launch DOSBOX. I should also note that in the case of this game, you aren’t returned to the DOSBOX command prompt when exiting the program. Instead, the emulator continuously displays a blank screen. As such, you’ll have to exit the emulator manually.